Best Way to Cut Metal Roofing and Metal Roof Panels
Cutting metal roofing panels correctly is essential for a professional finish and long‑lasting roof performance. Poor cuts can lead to leaks, sharp edges, coating damage, and safety hazards. This guide provides a comprehensive, yet straightforward, walkthrough for cutting metal roofing—whether you’re working on a small home project or a larger roof installation. Follow these practices to get clean, precise cuts while preserving the integrity of your panels.
As professional roofing contractors at OC Roof Kings, we have years of experience in delivering high-quality roof installations and repairs across Orange County, California. We understand the importance of precision when cutting metal roofing panels, ensuring that every cut enhances the overall durability and appearance of the roof. Follow these practices to get the best results and maintain safety during your project.
Why Proper Cutting Matters
Proper cutting ensures that metal panels fit accurately, seal correctly, and maintain their protective coatings. Clean cuts help prevent water intrusion and corrosion at seams. Moreover, precise shaping ensures that trim pieces, flashings, and penetrations (vents, chimneys, and skylights) fit snugly and look professional. Finally, safe cutting procedures protect workers from injury and avoid damage to materials, saving time, cost, and potential rework.
Overview of Common Metal Roofing Materials
Metal roofing often comes in several materials and profiles. Common materials include:
- Steel (galvanized or Galvalume-coated)
- Aluminum
- Sometimes copper or zinc for specialized roofs, though less common
Common panel styles:
- Flat panels (sheet metal)
- Corrugated roofing
- Standing seam panels
Each material and profile impacts how you should cut: thickness (gauge), coating, and bends/ribs. Proper identification is critical before starting.
Assessing the Job: Measurements and Layout
Start with accurate measurements. Determine where each panel will go, and plan cuts accordingly. Double-check all dimensions before marking. Mistakes here can cause costly rework.
Identifying Metal Type and Thickness
Know whether you’re working with steel, aluminum, or another metal and check the gauge/thickness. This affects blade choice and cutting method.
Also note the panel profile (flat, corrugated, or standing seam); cutting corrugated or ribbed panels differs from flat sheet work.
Safety Considerations and PPE
Wear cut‑resistant gloves, safety glasses or goggles, hearing protection, long sleeves, and long pants. If power tools generate dust or sharp fragments, use a respirator. Ensure proper footwear and avoid loose clothing that can catch on tools.
According to OSHA, it is essential to wear personal protective equipment (PPE) such as gloves, eye protection, and hearing protection when using circular saws and other power tools.
Workspace Setup
Work on a stable, flat surface. Use clamps or weights to secure panels and prevent movement. Lay drop cloths or protective padding under sheets to avoid damaging painted or coated surfaces. Make sure the area is well-lit and free from tripping hazards.
Best practices for securing panels and maintaining a safe worksite can be referenced through National Safety Council (NSC). Their guidelines offer comprehensive safety advice for construction sites.
Tools and Supplies
| Tool | Description | Best For | Pros | Cons |
|---|---|---|---|---|
| Tin Snips | Manual hand tool for cutting metal sheets | Small cuts, trim work | Precise, portable, inexpensive | Slow for large cuts, requires effort for thicker sheets |
| Electric Shears | Power tool with blades for cutting metal | Long cuts, corrugated panels | Fast, clean cuts with minimal burrs | Expensive, requires power source |
| Angle Grinder | Handheld power tool with a rotating disc | Quick cuts, demolition, rough work | Quick, effective for straight cuts | Sparks, heat damage to coating, noisy |
| Circular Saw | Power saw with a metal-cutting blade | Straight cuts, long panels | Fast for large cuts, efficient | Requires metal blade, sparks, vibration |
| Jigsaw | Power tool with a saw blade | Curves, internal cutouts | Good for curves and irregular shapes | Slower than circular saw, rougher cuts, less precise |
| Reciprocating Saw | Power tool with back-and-forth blade movement | Rough cuts, demolition | Good for rough cuts, versatile | Less control, slower, can damage material if not controlled |
| Nibbler | Tool or attachment that cuts through metal in small pieces | Curves, irregular shapes, notches | Minimal burrs, good for precision cutting | Requires steady hand, can be slow for large cuts |
| Plasma Cutter | High-heat tool that melts and cuts through metal | Precision cuts on thicker materials | Fast, clean cuts, precise | Requires experience, expensive, generates fumes |
Hand Tools
- Tin snips (straight, left-cut, right-cut) — for small cuts, trim work, flashings
- Aviation snips — useful for curves or detail work on thinner metal panels
Power Tools
- Angle grinder with a cut-off wheel
- Circular saw with metal-cutting blade (carbide-tipped or fine-tooth blade)
- Jigsaw with metal-cutting blade
- Reciprocating saw (for rough cuts or demolition)
Specialty Tools
- Electric or pneumatic metal shears
- Nibbler (handheld or attachment) is ideal for curves, cutouts, and corrugated profiles
- For advanced/industrial work: plasma cutter (for users with experience and proper safety measures)
Accessories
- Cutting lubricant (helps reduce heat and friction)
- Permanent marker or chalk, straightedge or ruler
- Tape measure, square, clamps or weights
- Deburring tools or metal file to smooth edges
Cutting Methods: Pros and Cons
Step-by-Step Procedures
| Step | Action | Recommended Tools | Notes |
|---|---|---|---|
| 1. Measure and Mark | Accurately measure and mark the cutting lines | Measuring tape, permanent marker, square | Double-check all dimensions before starting |
| 2. Secure the Sheet | Clamp or secure the metal sheet to prevent movement | Clamps, stable surface | Ensure metal is supported properly to avoid bending |
| 3. Select Tool | Choose the correct cutting tool based on the material and cut type | Tin snips, electric shears, angle grinder, etc. | Use the right tool for the job to ensure clean cuts |
| 4. Cutting | Cut along the marked lines, ensuring smooth, steady cuts | Depends on the tool selected (angle grinder, circular saw, etc.) | Cut slowly and steadily to avoid mistakes and damage |
| 5. Deburr and Clean Edges | Smooth sharp edges to prevent injury and rust | Metal file or deburring tool | Always clean up burrs or jagged edges after cutting |
| 6. Finish and Seal | Apply primer or sealant to prevent rust at cut edges | Rust inhibitor or primer, cloth | Ensure edges are properly treated to prolong material life |
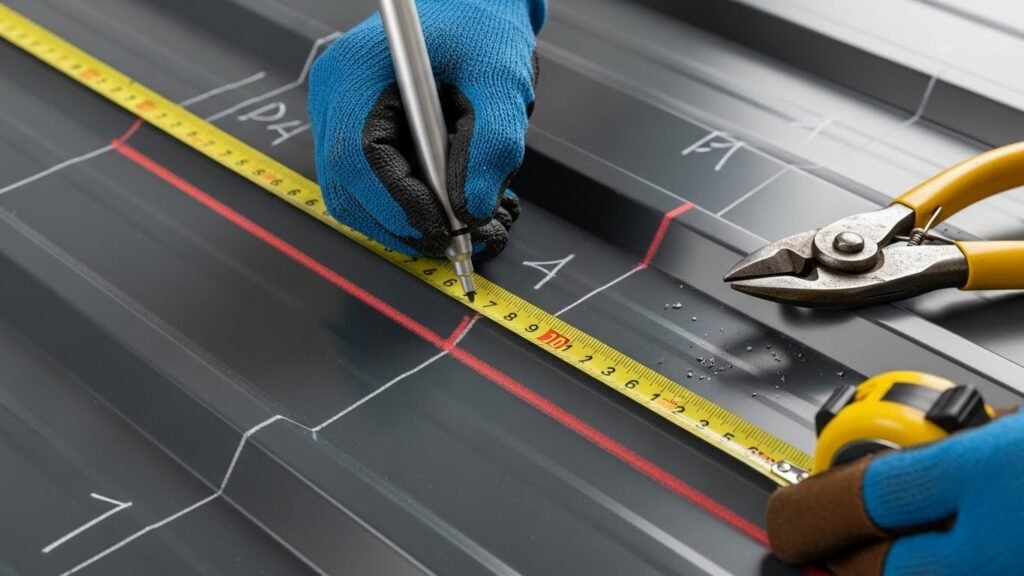
Marking Cut Lines and Panel Alignment
- Measure carefully and mark with a permanent marker or chalk line.
- Use a straightedge or square to draw accurate, visible guidelines.
- Double-check all measurements before cutting.
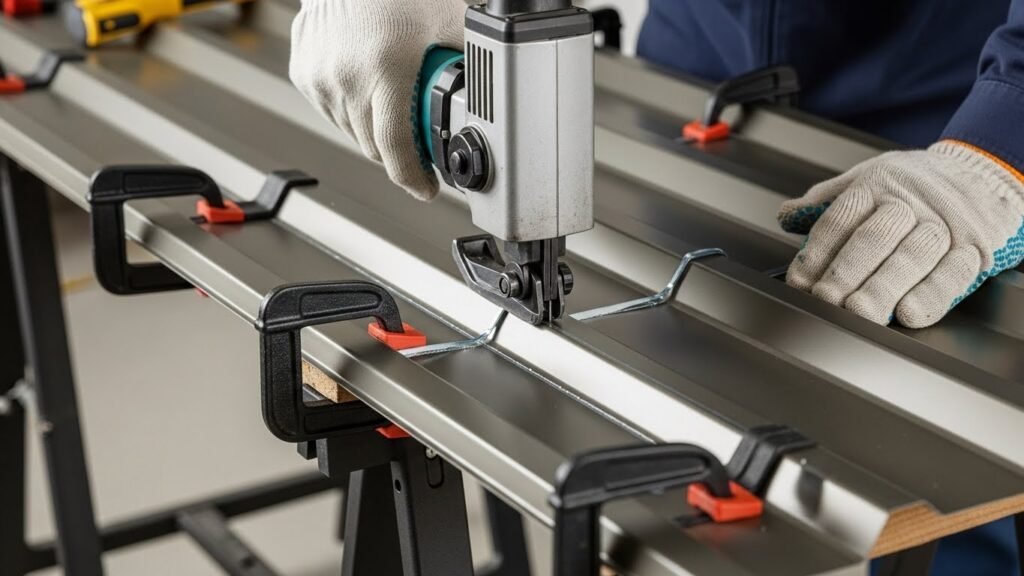
Clamping and Supporting the Sheet
- Secure the panel firmly on a stable surface with clamps or weights.
- Especially for corrugated or ribbed panels: support beneath to avoid distortion.
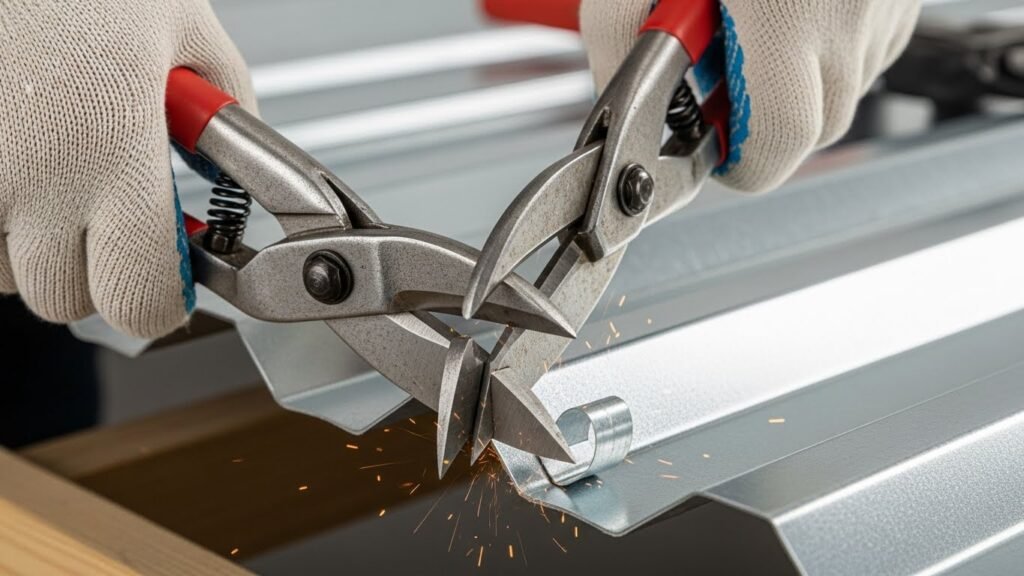
Using Tin Snips (Straight or Curved Cuts)
- Align the snips with your cut line.
- Use smooth, controlled cuts rather than forcing the tool.
- For curves or flashings, use left/right snips as needed.

Angle Grinder
- Attach a proper cutoff wheel.
- Secure the sheet, and wear full PPE (gloves, goggles, ear protection, and long sleeves).
- Start cutting gently, managing sparks, ensuring sparks are directed away from flammable materials, and allowing for cooling during extended cuts.
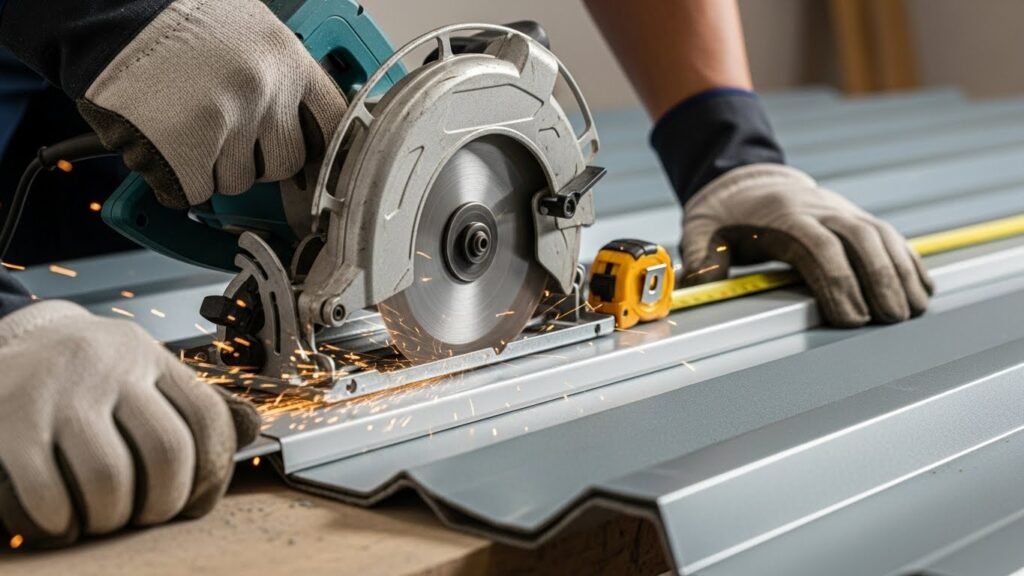
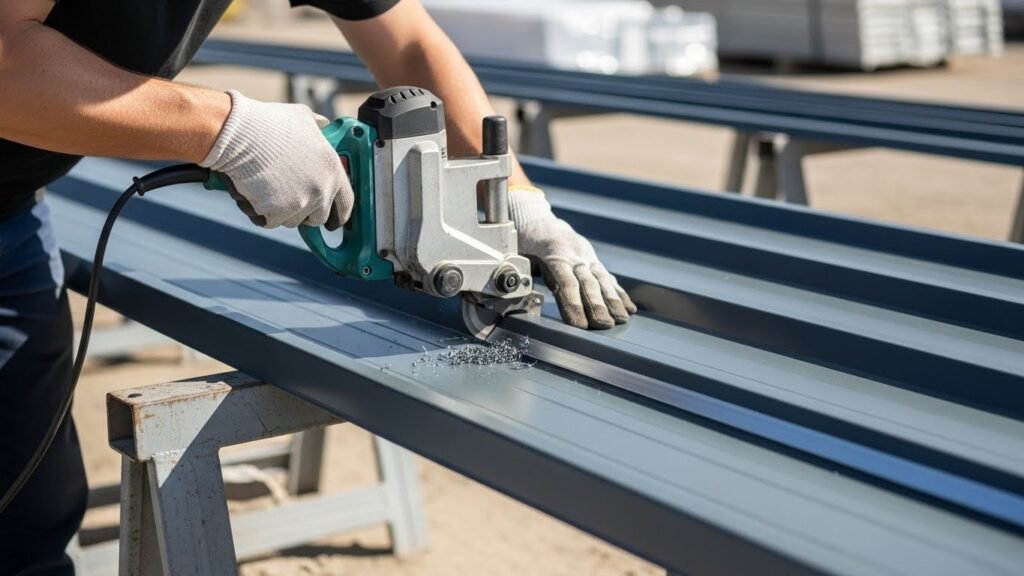
Circular Saw or Jigsaw
- Fit a blade designed for metal roofing (fine-tooth, carbide‑tipped)
- Align the blade carefully, and maintain a steady speed and pressure.
- For internal cutouts (vents, skylights), create a starter hole, then plunge cut slowly.
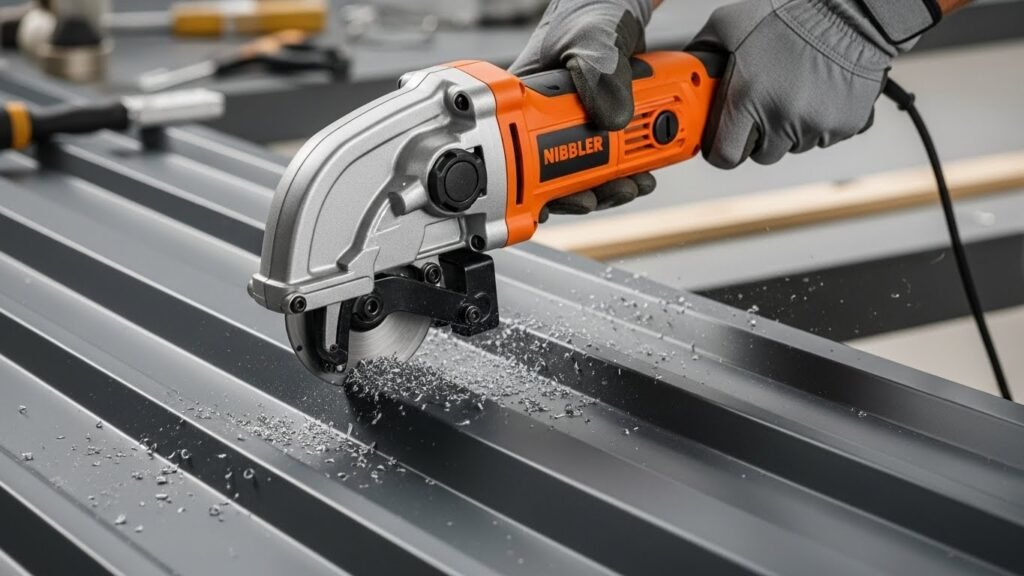
Nibbler or Electric Shears
- Feed the metal sheet steadily.
- Follow curves or complex cut lines carefully.
- Keep the sheet supported to prevent bending or distortion.
Finishing Cuts: Deburring and Smoothing Edges
- After each cut, inspect edges for burrs or sharp metal shards.
- Use a metal file or deburring tool to smooth edges.
- Clean the panel before installation to remove metal filings or dust
Cutting Common Shapes and Details
- Around vents, chimneys, skylights, and protrusions: Measure exact dimensions, allow clearance for flashing, mark cut lines, and cut carefully. Use nibblers or a jigsaw for internal cutouts.
- Straight long cuts: Circular saws or electric shears are most efficient. Use a straightedge guide or clamps for precision.
- Curved cuts, notches, and trim pieces: Nibblers, or aviation snips, offer control; finish with a deburring tool for clean edges.
- Flashings, drip edges, and trim pieces: Prefer tin snips or shears for clean edges; avoid grinders that may damage coatings.
Safety and Environmental Considerations
- Sparks from grinders or saws may ignite nearby flammable materials; always clear the area.
- Metal shards and burrs pose cut hazards; keep the workspace clean and dispose of off cuts properly.
- Cutting metal generates dust and possibly metal particles; use respirators if needed.
- Use hearing protection when operating power tools.
- Collect and recycle metal offcuts to reduce waste and environmental impact. Proper disposal helps maintain a safe, clean worksite.
Troubleshooting and Common Mistakes
- Jagged or uneven edges are often due to dull blades or an improper tool for the material. Use fresh blades and correct tool selection.
- Metal deformation or warping caused by improper support or applying too much pressure. Always support sheets; let tools do the work.
- Paint coating damage and rust risk grinders or tools that generate heat can scorch coatings or remove protective layers. Prefer “cold-cut” tools like shears, nibblers, or carbide‑blade saws.
- Inaccurate cuts often from incorrect measurements or insufficient marking. Measure twice, mark carefully, and clamp sheets before cutting.
If a cut is wrong, you may need to patch with a flashing or scrap piece but that adds seams, complicates waterproofing, and affects aesthetics.
Maintenance and Aftercare
- After installation, seal any exposed cut edges using primer or metal-compatible sealant to prevent rust or corrosion.
- Inspect fasteners, overlaps, and seams ensure no sharp edges are exposed.
- During routine inspections (e.g., seasonal checks), monitor for rust, loose edges, or deformation around cut areas.
Cost and Time Estimates
| Tool | Estimated Purchase Cost | Rental Cost (per day) | Time Estimate (for a typical project) |
|---|---|---|---|
| Tin Snips | $10 – $30 | N/A | 1 – 2 hours for small cuts and trims |
| Electric Shears | $40 – $150 | $20 – $50 | 30 minutes to 1 hour for longer cuts |
| Angle Grinder | $40 – $150 | $15 – $40 | 1 – 2 hours depending on project size |
| Circular Saw (metal blade) | $100 – $300 | $30 – $70 | 30 minutes to 1 hour for large straight cuts |
| Jigsaw | $50 – $200 | $15 – $40 | 1 – 2 hours for complex cuts or curves |
| Reciprocating Saw | $50 – $150 | $20 – $50 | 1 – 2 hours for rough cuts |
| Plasma Cutter | $400 – $1,500 | $75 – $200 | 30 minutes to 1 hour depending on material thickness |
- Tools: Basic tin snips are inexpensive ( $25). Power tools (electric shears, circular saw with metal blade, nibbler) range from modest ($80–200) to high-end ($300), depending on quality.
- Time:
- Large sheet cuts using a circular saw or shears: seconds to a few minutes per panel.
- Small trims/flashings with tin snips: minutes each.
- Detailed curves or cutouts with a nibbler or jigsaw: longer, especially if multiple cutouts are needed.
Renting heavier tools (e.g., electric shears, nibblers) may be a cost-effective option for one-time jobs rather than buying.
Conclusion
Cutting metal roofing panels is a critical step that affects the durability, appearance, and performance of the finished roof. With proper preparation, the right tools, and careful technique, you can achieve clean, accurate cuts that stand the test of time. Hand tools like tin snips offer precision for small tasks. Electric shears, nibblers, and circular saws, when fitted with correct blades, deliver efficiency and cleaner edges for larger jobs. Always prioritize safety, proper support, and cleanup.
At OC Roof Kings, we emphasize expertise, quality, and safety in every roofing project. If you want reliable results, whether you’re doing it yourself or hiring professionals, you can count on us to deliver. Call us at (949) 561‑2069 to discuss your metal roofing needs or to request a detailed checklist before your next project.
Frequently Asked Questions (FAQ’s)
Yes, you can cut metal roofing with a circular saw but ensure you use a metal-cutting blade designed for metal. This will allow clean, efficient cuts without damaging the material.
For expert help, call OC Roof Kings at (949) 561‑2069.
To cut metal roofing by hand, use tin snips or aviation snips for small, straight or curved cuts. Mark the cut line and securely clamp the sheet for control.
Professionals typically use electric shears, nibblers, circular saws, or plasma cutters depending on the project. These tools ensure speed, precision, and clean cuts on various materials and panel profiles.
For professional service, call OC Roof Kings at (949) 561‑2069.
The best tool for cutting metal roofing depends on the task: circular saws for straight cuts, electric shears for curves, and plasma cutters for precise cuts in thicker panels.